# 5.1 构建简史
# 5.1.1 前端进化史
# 洪荒时代
- Vanilla javascript/HTML/CSS
1993年-HTML(超文本标记语言)-> 1994-css(层叠样式表)-> javaScript
- 最火热的话题
DOM、BOM、样式放在哪、浏览器的兼容性.....
- jQuery
- 简化DOM操作
- 制作底层API(如xhr)
- 制作炫酷动画
- 解决浏览器兼容性问题
- Bootstrap
- 用class决定元素的功能和样式
- “组件”开始出现
- 工程化的问题开始显现
# 曙光初现
- Nodejs出现
- NodeJS v0.0.1-2009年
- 利用v8和libuv,让JS代码运行于浏览器之外
- Node出现之前,构建脚本往往需要使用Makefile、Shell编写
 var sass=require('node-sass')
 sass.render(
     {file:scss_filename,[,option...]},
     function(err,result){/*...*/}
 )
2
3
4
5
# 百家争鸣
- Grunt/Gulp
- 构建工具流开始初步形成
- 编写简单、生态丰富
# 语言的进化
ECMAScript 6的出现
即ES2015,诞生于2015年6月
现代的语法极大的提高了开发效率
- 箭头函数
- Clas语法
- Promise/Gennerator
- ES Module ......
# MV*框架
- 现代mv*框架的出现
- Angular、React、Vue
- 单文件组件、JSX
- 大量利用了ES6新特性
# MV*框架
- AMD/CMD
纯前端模块化方案
AMD:require.js
CMD:sea.js
- CommonJS
- NodeJS模块化方案
- 同步引用依赖、符合人类视觉
    module.exports=function(){
        return 'a'
    }
    var a=require('./a')
2
3
4
- ES Module
ES6规带来的语言级模块化方案
支持Node/Browser等运行时
利于静态分析
export default function (){ return 'a' }
import { default as a } from './a'
2
# 5.1.2 现代化的前端构建
- 我们需要怎样的前端构建
性能:图片优化、合并资源、减少Polyfill体积
模块化:Commonjs/ES Module-> script
强力的语法转换:ES6、7、8...
统一打包过程、整体分析优化:Vue单文件组件
- Babel、webpack
# 5.2 不得不提的babel:token-ast
# 5.2.1 回顾AST
# 《代码规范》中的介绍
AST是一种可遍历的、描述代码的树状结构,利用AST可以方便的分析代码的结构和内容。
AST Explore (opens new window)
# 5.2.2 编译理论
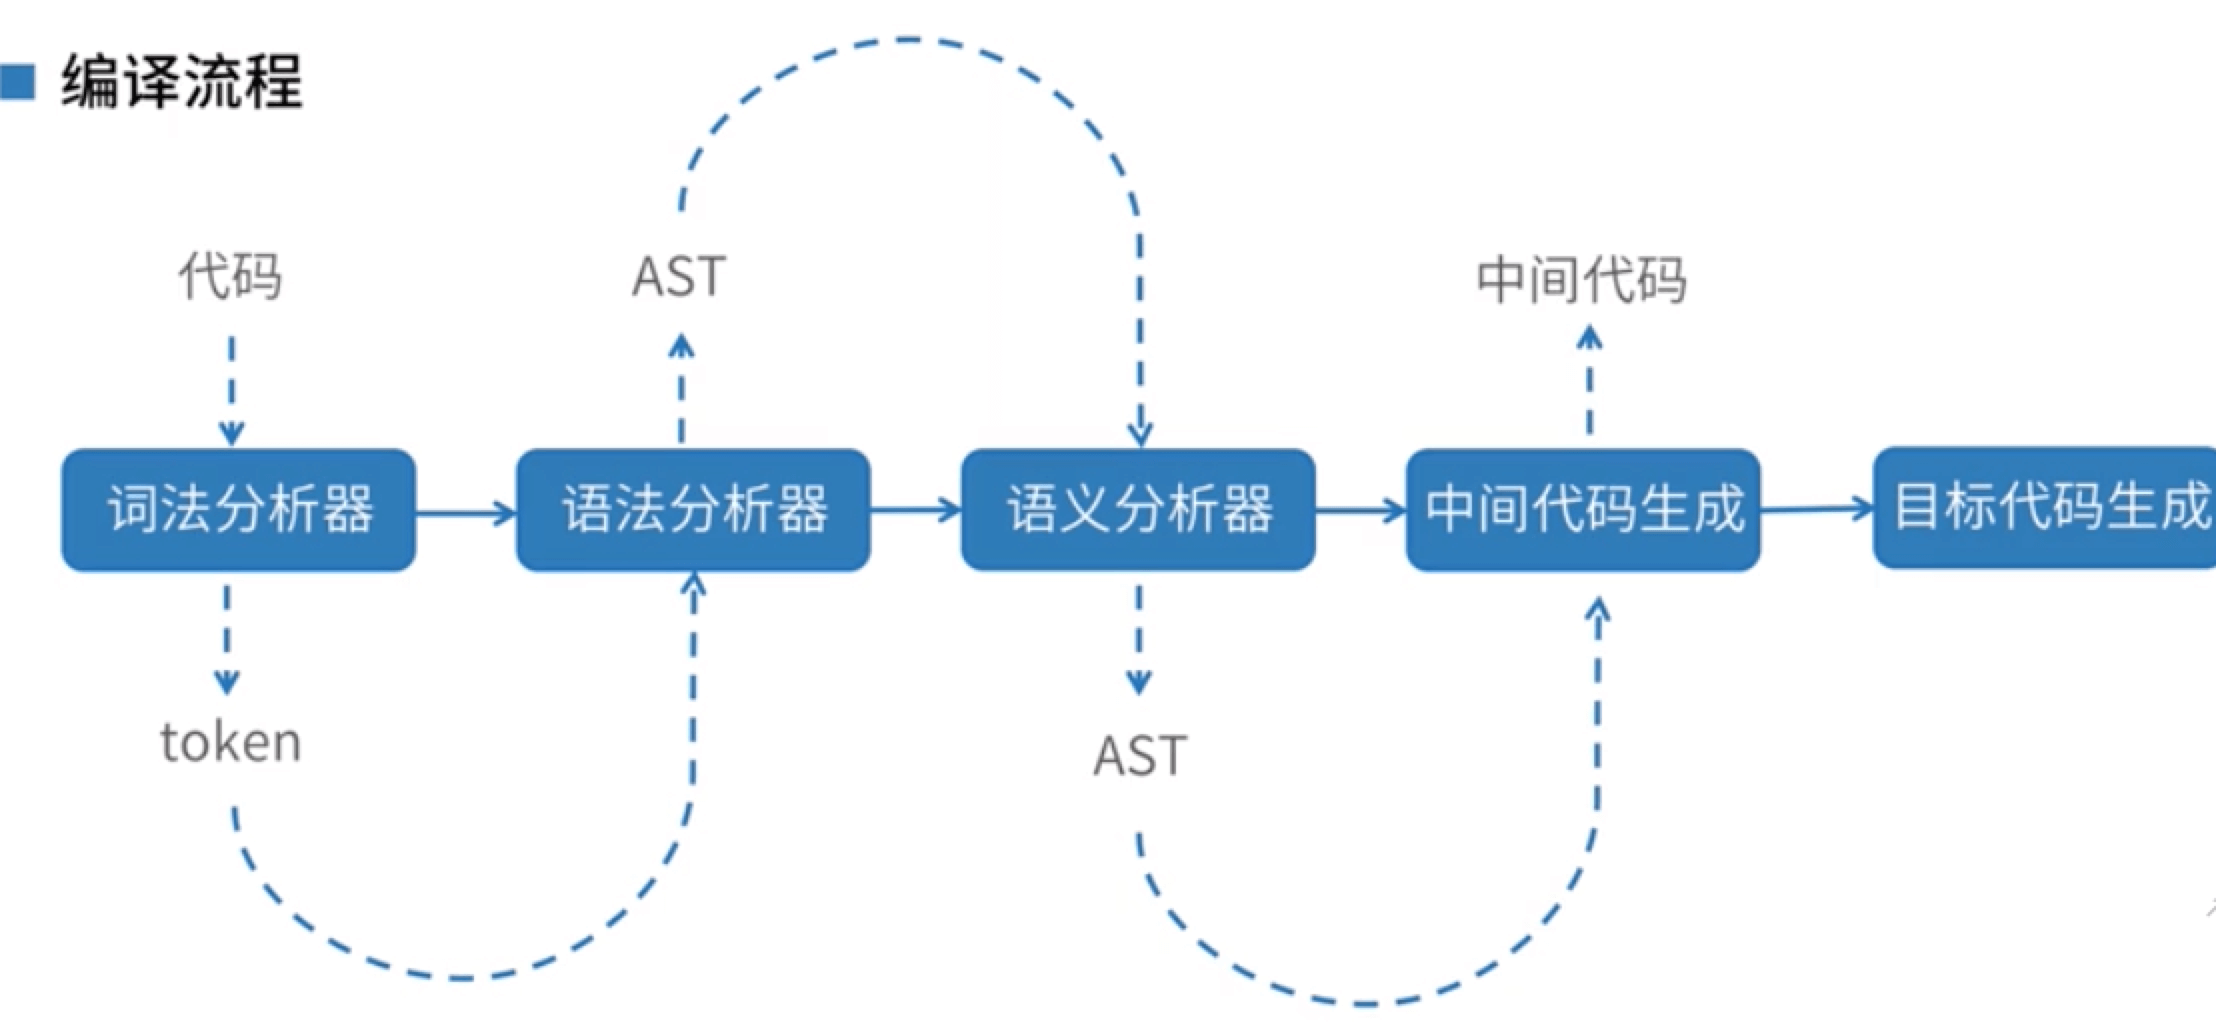
# Babel中的编译
Babel也是编译器
输入的是高版本的ES代码,输出的是符合我们要求的低版本的ES代码,例如:ES7->ES5
Babel的工作步骤
根据Babel文档,其工作步骤其实主要分为三步
解析(Parsing):解析代码,生成AST(抽象语法树)
变换(Transformation):操作AST(抽象语法树),修改其内容
生成(Code Generation):根据AST(抽象语法树)生成新的代码
# 5.2.3 如何实现简单编译器
# 目标
- LISP->C
| LISP | C | |
|---|---|---|
| 2+2 | (add 2 2 ) | add(2,2) |
| 4-2 | (subtract 2 2 ) | subtract(4,2) |
# parsing
- Tokenizing
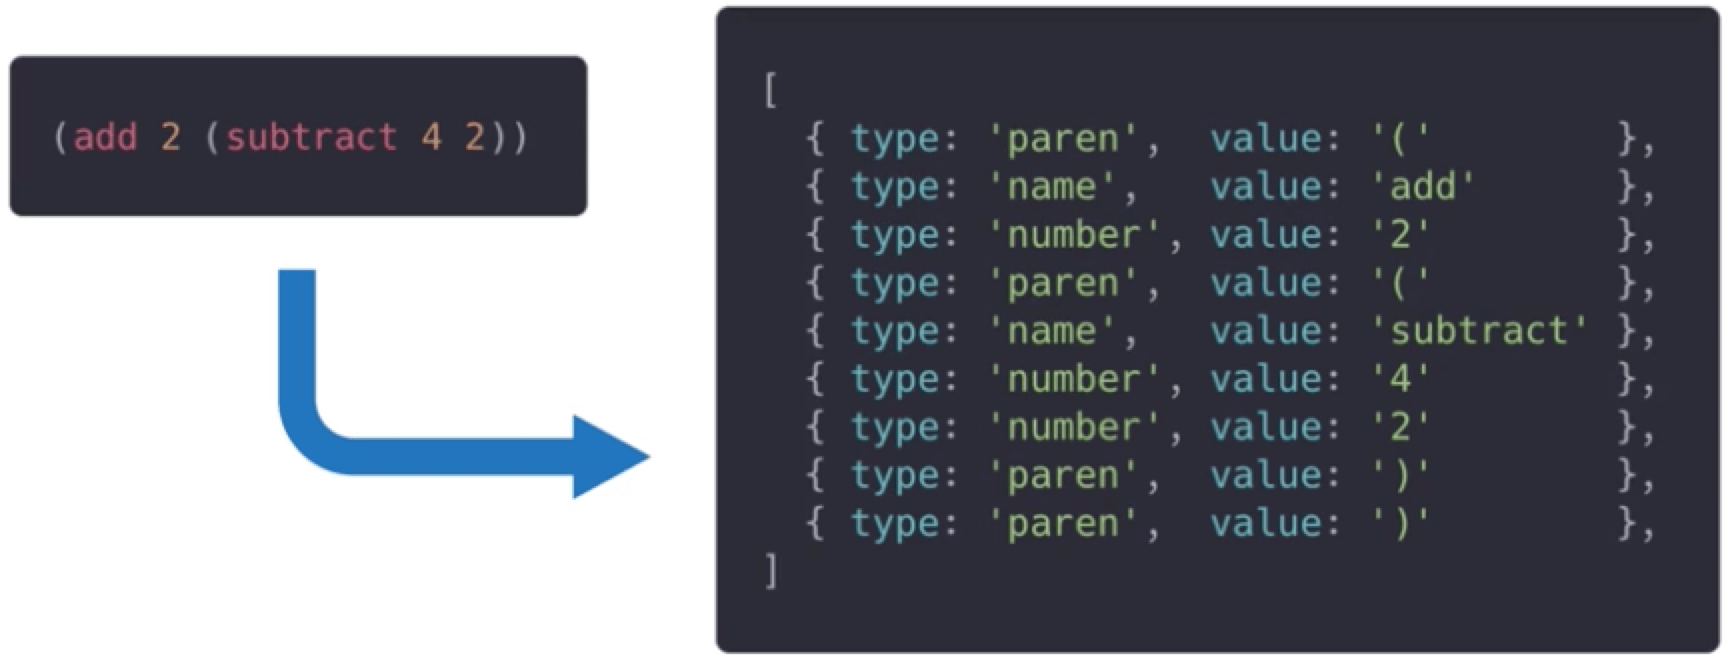
- Tokenizer函数
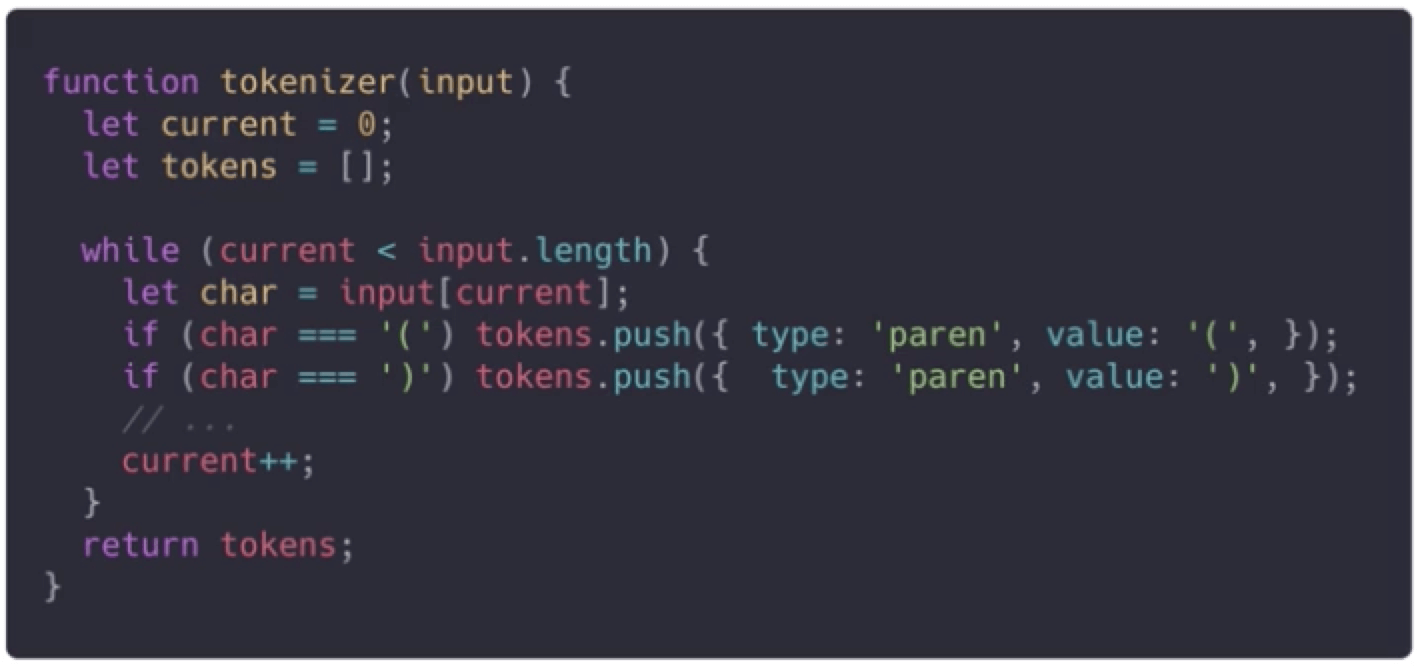
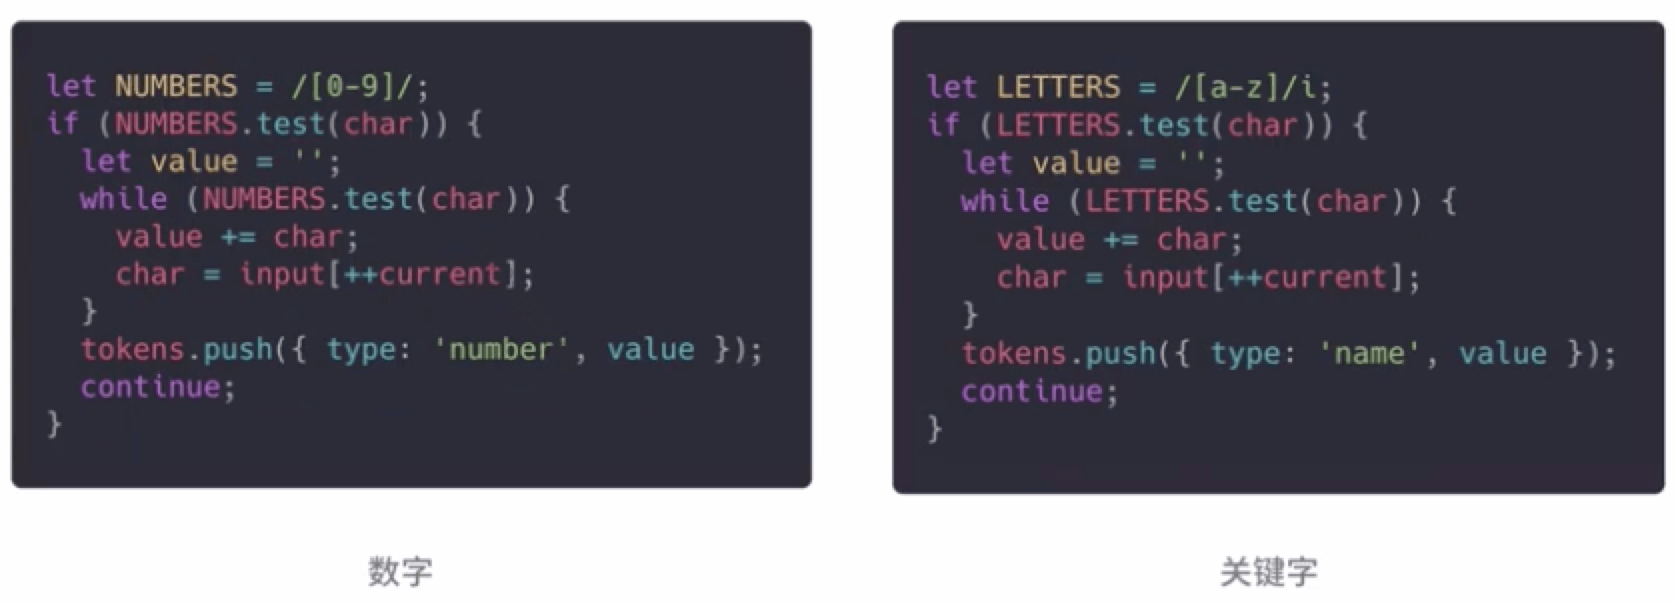
将代码转换成token
- Parser函数
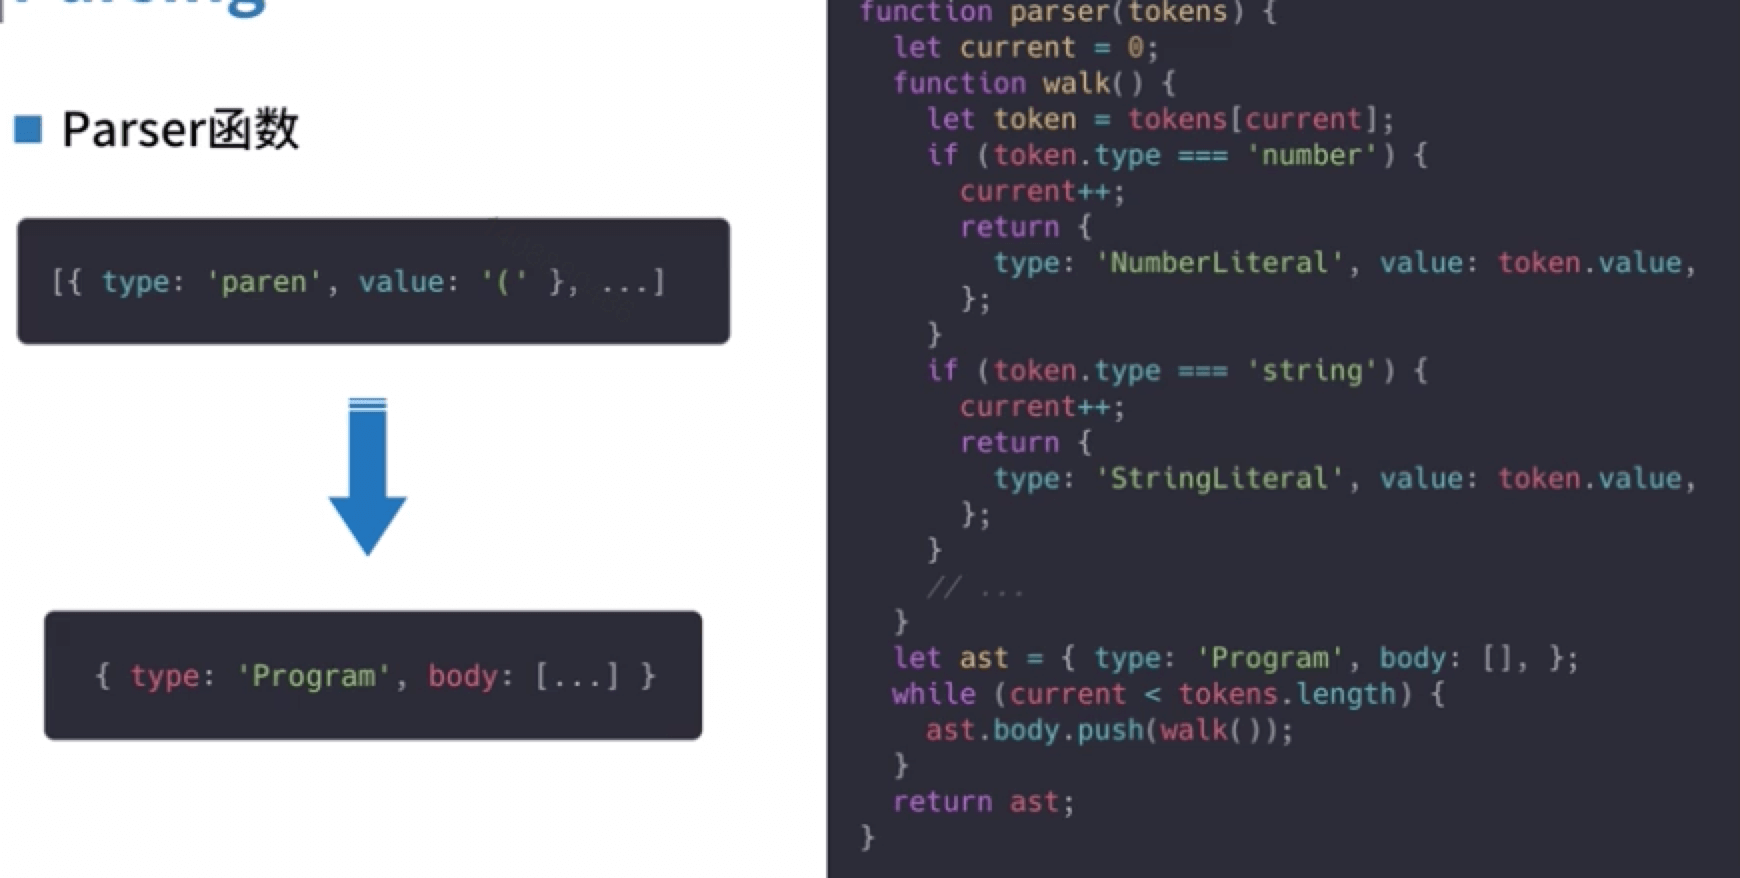
将token转换为AST
# transformation
- Traverser函数
深度优先地遍历AST树
- TransFormer函数
在遍历每一个节点时调用将旧AST转成一颗新树,就是转换为目标语言的树
# Code Generator
- Code Generator
深度优先地遍历新的AST树,将每个节点依次组合新代码
- 最终的Compiler
- input -> tokenizer -> tokens
- Tokens -> parser -> ast
- ast -> transformer -> newAst
- newAst -> generator -> output
    function compiler (input) {
        let tokens= tokenizer(input)
        let ast = parser(tokens)
        let newAst=transformer(ast)
        let output= codeGennerator(newAst)
        return output
    }
2
3
4
5
6
7
# 5.2.4 扩展资料
the-super-tiny-compiler项目 (opens new window)
国大学慕课:编译原理 哈尔滨工业大学: (opens new window)
# 5.3 不得不提的babel:基本概念
# 5.3.1 Babel的作用
# Babel是啥?
Babel 是啥?
Babel is javaScript compiler
主要将ECMAScript 2015+的代码,转换成让我们能够在更古老的浏览其和其他环境运行的、兼容性更好的、老版本javascript代码
Babel 能干嘛?
作用1: 语法转换
   [1,2,3].map((n)=>n+1)  => [1,2,3].map(function(n){
                                   return n+1
                                })
2
3
作用2: Polyfill
  Array.from(new Set([1,2,3]))
  [1,[2,3],[4,[5]]].flat(2)
  Promise.resolve(32).then(x=>console.log(x))
2
3
让 老环境支持新的api
作用2: 源码修改
去除Flow/TypeScript代码中的类型标识
  function square (n:number):number {
      return n+n
  }
  // ------transformation------
  function square (n) {
      return n+n
  }
2
3
4
5
6
7
# 5.3.2 Syntax & Feature
# Syntax
- Syntax
语言级的某一种概念的写法,不可被语言中的其他概念实现
举个例子
// 1. 箭头函数
(a,b,c)=>a+b+c
// 2. Class类
 class A {}
// 3. ES模块
import * as ext from ‘fs-ext’
2
3
4
5
6
# feature
- Feature 就是指API
实例方法、静态方法、全局对象等
举个例子
// 1. promise
new Promise().then()
//2. Object.keys
Object.keys({a:1})
// 3. [].inculdes
[1,2,3].includes(2)
2
3
4
5
6
# 5.3.3 plugin / preset / env
# plugin
- 插件
babel本身不会对代码做任何操作,所有功能都靠插件实现
- 有哪些插件?
@bable/plugin-transform-arrow-functions
@babel/plugin-transform-destructuring
@bable/plugin-transform-classes
......
# preset
- preset是什么?
A set of plugins,一组插件的集合
- 官方preset
@babel/preset-env
@babel/preset-flow
@babel/preset-react
@babel/preset-typescript
module.exports=function (){
    return {
        plugins:[
            "pluginA",
            "pluginB",
            "pluginC"
        ]
    }
}
2
3
4
5
6
7
8
9
# env
- env的出现
@bable/preset-env是一种更加智能的preset,让我们指需要根据我们的目标环境,快速配置babel
- env的配置例子
{
    "target":">0,25%,not dead"
}

{
    "target":{"chrome":"58","ie":"11"}
}
2
3
4
5
6
7
# 5.3.4 扩展资料
browserlist项目地址 (opens new window)
compat-table项目地址 (opens new window)
# 5.4 不得不提的babel:使用
# 5.4.1 Babel的使用方式
- 直接require
const bable=require("@babel/core")
babel.transform(code,options,function(){
    result // =>{code,map,ast}
})
2
3
4
- babel-cli
babel src --out-dir lib --ignore "src/**/*.spec.js","src/**/* .test.js"

babel -node --inspect --presets @babel/preset-env -- script.js --inspect
2
3
- Webpack / Rollup
    module:{
        rules:[
            test:/\.m?js$/,
            exclude:/(node_modules | bower_components)/,
            use:{
                loader:'babel-loader',
                options:{
                    presets:['@bable/preset-env']
                }
            }
        ]
    }
2
3
4
5
6
7
8
9
10
11
12
# 5.4.2 Babel 的配置
# 配置的位置
- 项目根目录的.babelrc.json
对整个项目生效
- 工程根目录的babel.config.json
对整个工程生效(可跨项目)
- package.json的babel字段
相当于.babel.json
# plugin
- plugin的使用
module.exports={
    // "@babel/preset-env" ,下面配置的是简写,如果工程配置中找不到包,可能是被简写了
    presets:["@babel/env"],
    // same as "@babel/plugins-transform-arrow-functions"
    plugins:["@babel/transform-arrow-function"]
}
2
3
4
5
6
- plugin的几种配置
// 以下三种配置方式等价
module.exports={
  “plugins”:[
      "pluginA":,
      ["pluginA"],
      ["pluginA",{}] // 如果plugin配置成数组,第一项是插件名称,第二项是配置
  ]
}
2
3
4
5
6
7
8
利用以下方式,我们可以将配置传入插件
module.exports={
  “plugins”:[
      [
          "transform-async-to-module-method",
          {
              "module":"bluebird",
              "method":"coroutine"
          }
      ]
  ]
}
2
3
4
5
6
7
8
9
10
11
- plugin的顺序
- Plugins在preset之前执行
- Plugin之间从前往后依次执行
babel为什么这么设计呢?
因为preset配置的是比较成熟的语法,plugin主要配置一些更新特性,plugin在preset之前执行是保证这些新特性是最先被转换的,保证preset只关心比较稳定的语法
# preset
- preset的使用
{
    "preset":[
        ["@bable/preset-env",{
            "loose":true,
            "modules":false
        }]
    ]
}
2
3
4
5
6
7
8
为什么preset也需要配置呢?
因为preset本质就是一组plugin的集合,plugins可以配置,当然preset也可以配置,甚至preset可以依赖另一个preset
- preset的本质
    module.exports=()=>({
        presets:[
            "@babel/preset-env"
        ],
        plugins:[
            [
                "@babel/plugin-proposal-class-properties",
                {loose:true}
            ],
            "@babel/plugin-proposal-object-rest-spread"
        ]
    })
2
3
4
5
6
7
8
9
10
11
12
- preset的顺序
- preset在plugin之后执行
- preset之间从后往前依次执行
// 执行顺序 c->b->a,这个设计babel文档中说是历史原因造成的
{
    "preset":[
        "a","b","c"
    ]
}
2
3
4
5
6
# preset-env
- preset-env的配置
preset-env是最常用的preset,大部分情况下你只需用这一个preset就可以了
- 主要就是useBuiltins和target两个配置
- useBuiltins用来配置polyfill
- target用来告诉preset-env选择哪个插件
{
    "presets":[
        [
            "@babel/preset-env",
            {
                "useBuiltIns":"entry",
                "target":{
                    "esmodules":true,
                    "chrome":"58",
                    "ie":"11",
                    "node":"current"
                }
            }
        ]
    ]
}
2
3
4
5
6
7
8
9
10
11
12
13
14
15
16
- targets的配置
这个配置项是我们支持的平台是什么
{
    "targets" :{"chrome":"58","ie":"11"}
}
// or
{
    "targets" : "> .5%  and not last 2 versions"
}
2
3
4
5
6
7
- 可以是描述浏览器版本的对象,也可以是字符串(browserlist)
- browserlist完整语法
- 也可以将browserlist写在.browserslistrc中
- usebuiltins的配置
三种取值:“usage”、“entry”、“false”,默认是false
用于自动注入polyfill代码
false:什么也不做/不自动注入polyfill
entry:根据环境配置自动注入polyfill
usage:根据实际使用自动注入polyfill
# 5.4.3 polyfill
# Babel的Polyfiill
- Babel 7.4之前
统一使用@babel/polyfill
- babel 7.4之后
新的形式更有利于babel做进一步的转换
import "core-js/stable";
import "regenerator-runtime/runtime"
2
core-js用于polyfill大部分的ES新feature
regenerator-runtime/runtime用于转换generator函数
由于polyfill会用于运行时,所以要以dependencies方式安装
# Polyfill的使用
- 直接引入?
官方不建议直接引入,因为太大了,建议将preset-env的useBuiltins和corejs搭配使用。
- useBuiltIns:“entry”
在target配置为chrome71的条件下使用:
import 'core-js/stable'

// ------------------------

import "core-js/modules/es.array.unscopables.flat";
import "core-js/modules/es.array.unscopables.flat-map";
import "core-js/modules/es.object.form-entries";
import "core-js/modules/web.immediate"
2
3
4
5
6
7
8
- useBuiltins:false
Babel什么都不做,完全由你自己决定如何polyfill
- useBuiltins: "usage"
根据使用情况自动加入poilfill
// a.js
var set =new Set([1,2,3])

// 转换后
import 'core-js/module/es.array.iterator';
import 'core-js/modules/es.object.to-string';
import 'core-js/modules/es.set';
var set = net Set([1,2,3])
2
3
4
5
6
7
8
似乎完美了吗?
export class Animal {
    makeSound(){
        console.log('hi')
    }
}

//  ----------------------------

"use strict"
require("core-js/modules/es6.object.define-property")
function _classCallCheck(instance,constructor){//....}
function _defineProperties(target,props){//....}
function _createClass(Constructor,protoProps,staticProps){//....}
2
3
4
5
6
7
8
9
10
11
12
13
Polyfill函数被内联的写进文件里,如果工程中大量使用class语法,必然会出现大量的重复的polyfill
解决方法
yarn add -D @babel/plugins-transform-runtime
yarn add @babel/runtime
var _classCallCheck2=_interopRequireDefault(
    require('@babel/runtime/helpers/classCallCheck')
)
 var _classCallClass2=_interopRequireDefault(
    require('@babel/runtime/helpers/createClass')
)
2
3
4
5
6
让所有polyfill函数从@babel/runtime引入
带来的好处
- 减小包的体积
- 不会影响到全局环境
最终配置
module.exports = {
 presets: [
   ['@babel/preset-env', {
     useBuiltIns: 'usage'
     }]
 ],
 plugins: [
   "@babel/plugin-proposal-class-properties"
   ['@babel/plugin-transform-runtime'],
}
2
3
4
5
6
7
8
9
10
# 5.5 不得不提的babel:插件开发
# 5.5.1 Babel的插件的本质
# 插件长什么样?
export default function (){
    return {
        visitor:{
            Indentifier(path){
                const name=path.node.name;
                path.node.name=name
                 .split("")
                 .reverse()
                 .join("")
            }
        }
    }
}
2
3
4
5
6
7
8
9
10
11
12
13
# 从代码到AST
function square () {
    return n*n
}
2
3
Babel和ESlint一样,使用EStree规范生成AST结构,可以使用AST Explore (opens new window)查看
# 节点(Node)
- AST 每一层都拥有相同的结构,我们称之为节点(Node)
- 一个AST可以由单一的节点或成百上千个节点构成
- 它们组合在一起可以描述用于静态分析的程序语法
{
    type:"FunctionDeclaration",
    id:{.....},
    params:[......]
    body:{.....}
}

{
    type:"FunctionDeclaration",
    name:...
}

{
    type:"FunctionDeclaration",
    operator:......,
    left:{......},
    right:{...}
}
2
3
4
5
6
7
8
9
10
11
12
13
14
15
16
17
18
# 遍历
babel编译经过3个步骤,解析->变换->生成;其中解析和生成我们都不用关注,我们只用关注变换,先要转换AST,我们 需要对其进行递归的树形遍历
    {
      "type": "FunctionDeclaration",
      "start": 0,
      "end": 37,
      "id": {
        "type": "Identifier",
        "start": 9,
        "end": 15,
        "name": "square"
      },
      "expression": false,
      "generator": false,
      "async": false,
      "params": [],
      "body": {
        "type": "BlockStatement",
        "start": 19,
        "end": 37,
        "body": [
          {
            "type": "ReturnStatement",
            "start": 25,
            "end": 35,
            "argument": {
              "type": "BinaryExpression",
              "start": 32,
              "end": 35,
              "left": {
                "type": "Identifier",
                "start": 32,
                "end": 33,
                "name": "n"
              },
              "operator": "*",
              "right": {
                "type": "Identifier",
                "start": 34,
                "end": 35,
                "name": "n"
              }
            }
          }
        ]
      }
    }
2
3
4
5
6
7
8
9
10
11
12
13
14
15
16
17
18
19
20
21
22
23
24
25
26
27
28
29
30
31
32
33
34
35
36
37
38
39
40
41
42
43
44
45
46
47
从FunctionDeclaration 开始遍历
id节点,它是一个identifier,没有任何子节点属性
params数组,访问其中的任何一项,都是identifier
body -> BlockStatement -> body
ReturnStatement -> argument -> BinaryExpression
......
# 访问者模式
遍历AST的过程,其实就是不断访问各个节点的过程
Babel的插件,就是顺理成章地使用了访问者模式
const MyVisitor ={
    Indentifier:{
        enter(){
           console.log("Entered")
        },
        exit(){
            console.log("EXited")
        }
    }
}
2
3
4
5
6
7
8
9
10
访问者的每个方法都能获取2个参数,path和state
- path
path是我们对节点的引用
   {
       type:"FunctionDeclaration",
       id:{
           type:"Identifier",
           name:"square"
       }
       ......
   }
   // path拿到父节点
   {
       "parent":{
           "type":"FunctionDeclaration",
           "id":{}
           .....
       },
       "node":{
           "type":"Identifier",
           "name":"square"
       }
   }
2
3
4
5
6
7
8
9
10
11
12
13
14
15
16
17
18
19
20
- path方法可以帮助我们访问父节点,帮助我们取得上下文信息。
- path方法上面有很多工具方法,帮助我们方便的操作AST。
- State
插件的“状态,比如: 当前plugin的信息、plugin传入的配置参数,甚至处理过程中的自定义状态
{
    plugins:[
        ["my-plugin",{
            "options":true,
            "options":false
        }]
    ]
}
// babel中通过state拿到配置参数
{
    visitor:{
        FunctionDeclartion(path,state){
            console.log(state.opts)
            // {option1:true,option2:false}
        }
    }
}
2
3
4
5
6
7
8
9
10
11
12
13
14
15
16
17
- 完整面貌
export default function (babel) {
    // babel的一些工具方法
    const {type:t,template}=babel
    return {
        name:"a-demo-plugin",
        visitor:{
            Indentifier(path,state){},
            ASTNodeTypeHere(path,state){}
        }
    }
}
2
3
4
5
6
7
8
9
10
11
一个babel对象为入参,以包含插件名和visitor的对象为返回值的函数
# 5.5.2 Babel的插件开发工具
| 工具 | 作用 |
|---|---|
| @babel/parser | 将源代码解析称AST |
| @babel/generator | 将AST生成js代码 |
| @babel/code-frame | 生成错误信息 |
| @babel/helpers | 提供一些内置的帮助函数 |
| @babel/template | 为parser提供模版引擎 |
| @babel/types | 主要用于处理节点类型相关的问题(判断、创建) |
| @babel/traverse | 工具类,用来遍历AST树 |
# 5.5.3 Babel的插件实战
# 实现一个Optional Chaining
foo?.bar
// --------------- 把上面的转换成下面的
foo==null?void 0: foo.bar
2
3
开发babel插件,首先对比2段代码的AST结构,利用astexplorer (opens new window)工具分别拿到json格式的AST,拿到2段转换后的json后,在利用diffchecker (opens new window)网站对比一下前后变换。
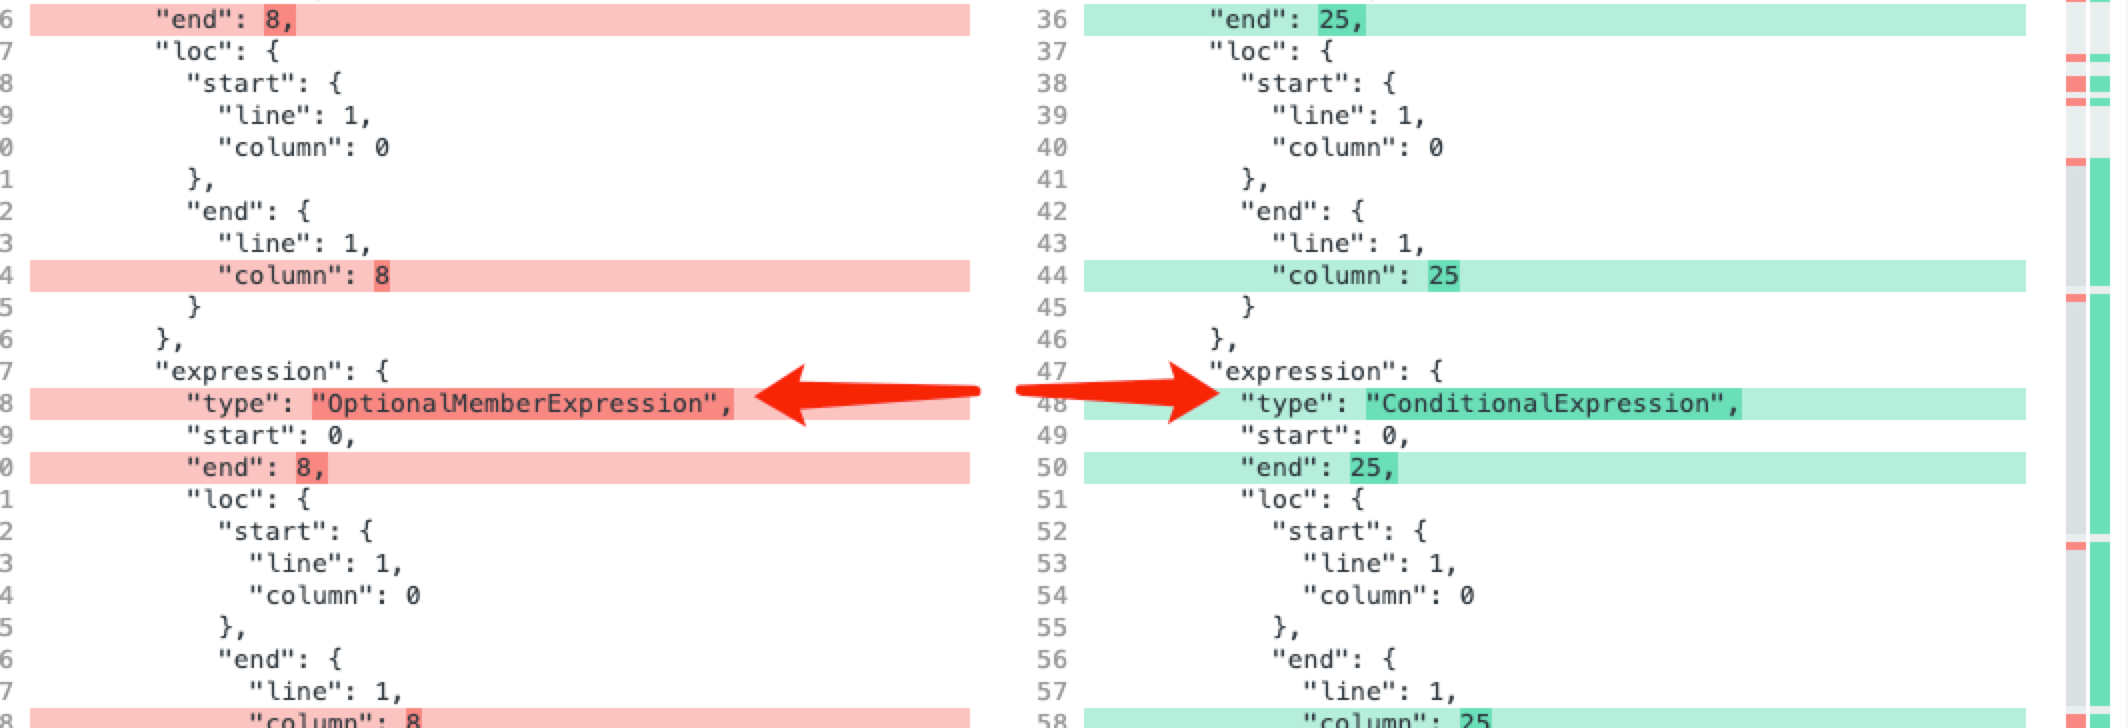
行数变化可以忽略,可以直接从结构上看见从哪里开始变化,可以看出是从OptionaMembeExpression变化成了ConditionalExpression;所以我们可以把
OptionaMembeExpression结构替换成ConditionalExpression。
// foo?.bar
// foo==null?void 0: foo.bar
const template = require('@babel/template').default
module.exports=function OptionlChainingPlugin(babel){
    return {
        name: 'optional-chaining-plugin',
        visitor: {
            // 通过刚刚的对比,我们知道就是替换OptionaMembeExpression这个表达式
            OptionaMembeExpression(path,state){
                 // path.replaceWith() 替换为新的节点
                 // path.remove() // 删除当前节点
                 // path.skip() //跳过子节点`
                path.repalceWith(
                 // 用 @babel/types这个包构造ConditionalExpression节点,但是这个包已经挂载到了bable上了,所以可以直接载babel访问
                 // conditionalExpression具体参数可以访问babel官网查看,t.conditionalExpression(test, consequent, alternate)
                 // 可以从对比图中看出,第一个参数test类型是BinaryExpression,是一个二元判断,也需要我们用babel.types构造
                  babel.types.conditionalExpression(
                  // 从babel文档中查看BinaryExpression所需要的的参数t.binaryExpression(operator, left, right)
                  // operator就是 ==   left(左值)就是foo  right(右值)就是null
                      babel.types.BinaryExpression(
                          '==',
                         babel.types.identifier(path.node.object.name),
                         babel.types.nulLiteral()
                    ),
                    template.expression('void 0'), //将字符串转换称号ast
                    babel.types.memberExpression(
                        babel.types.identifier(path.node.object.name) // 对象名称
                        babel.types.identifier(path.node.property.name) // 属性名称
                    )
                  )
                )
            }
        }
    }
}
2
3
4
5
6
7
8
9
10
11
12
13
14
15
16
17
18
19
20
21
22
23
24
25
26
27
28
29
30
31
32
33
34
35
# 5.6 深入webpack:设计思想
# 5.6.1 Tapable
# Tapable是啥?
Tapable是一个插件框架,也是Webpack的底层依赖,webpack几乎所有的功能都有插件提供,webpack本身创建了许多hook,各个插件注册在
自己感兴趣的hook上,有webpack在相应的时机去调用它们,tapable正是提供了这样的hook体系。
const {
    SyncHook, // 同步钩子
    SyncBailHook, // 同步熔断钩子
    SyncWaterfallHook, // 同步流水钩子
    SyncLoopHook,      // 同步循环钩子
    AsyncParalleHook, // 异步并发钩子
    AsyncParallelBaillHook,  // 异步并发熔断钩子
    AsyncSeriesHook,  // 异步串行钩子
    AsyncSeriesBailHook, // 异步串行熔断钩子
    AsyncSeriesWaterfallHook // 异步串行流水钩子
} = require('tapable')
2
3
4
5
6
7
8
9
10
11
# Tapable的使用
const { SyncHook } = require('tapable')
// 创建实例
const syncHoook=new SyncHook(["name","age"])

// 注册事件
syncHook.tap("1",(name,age)=>{console.log("1",name,age)})
syncHook.tap("2",(name,age)=>{console.log("1",name,age)})
syncHook.tap("3",(name,age)=>{console.log("1",name,age)})

syncHook.call("Harry Potter",18)

// output:
// 1 Harry Potter 18
// 2 Harry Potter 18
// 3 Harry Potter 18
2
3
4
5
6
7
8
9
10
11
12
13
14
15
# 5.6.2 Webpack工作流程
- 初始化配置
初始化既包括配置的初始化,也包括tapable插件体系的初始化,主要就是实例Compiler这个对象
class Compiler extends Tapable {
    constructor (context) {
        super()
        // 实例一系列tapable hook
        this.hooks={
            shouldEmit: new SyncBailHook(["compilation"]),
            done:new AsyncSeriesHook(['stats']),
            beforeRun: new AsyncSeriesHook(["compiler"]),
            run: new AsyncSeriesHook(['compiler']),
            emit: new AsyncSeriesHook(["compilation"]),
            afterEmit: new AsyncSeriesHook(["compilation"])
        }
    }
}
2
3
4
5
6
7
8
9
10
11
12
13
14
- 准备工作(初始化Plugins等)
初始化plugin的过程就是依次调用pluginapply的过程
    class SourceMapDevToolPlugin {
        // 在我们实例化的`Compiler`对象上注册每个钩子的回调函数
        apply(compiler){
            compiler
              .hooks
              .compilation
              .tap("SourceMapDevToolPlugin",compilation=>{
                  compilation
                   .hooks
                   .afterOptimizeChunkAssets
                   .tap(xxx,()=>{context,chunks})
              })
        }
    }
2
3
4
5
6
7
8
9
10
11
12
13
14
resolve源文件,构建module
生成thunk
构建资源
最终文件生成
事实上从第三步开始,都有plugin注册hook回调函数的方式在参与
# 5.6.3 Webpack的主要概念
- Entry
- Entry是webpack开始分析依赖的入口
- Webpack从Entry开始,遍历整个项目的依赖
module.exports={
    entry:'./path/to/my/entry/files.js'
}

module.exports={
    entry:{
        app:'./src/app.js',
        adminApp:'./src/adminApp.js'
    }
2
3
4
5
6
7
8
9
enrty 可以有一个,也可以有多个
- Output
Output用来指示Webpack将打包后的bundle文件放在什么位置
    const path=require('path');
    module.exports={
        entry:'./path/to/my/entry/files.js',
        output:{
            path:path.resolve(__dirname,dist),
            fileName:'my-fist-webpack-bundle.js'
        }
    }
2
3
4
5
6
7
8
Loader
Loader能够让Webpack处理非JS/JSON的文件
处理:将一切格式转为JS模块,以便Webpack分析依赖关系和方便我们在浏览器中加载
   const path=require('path');
   module.exports={
       entry:'./path/to/my/entry/files.js',
       output:{
           path:path.resolve(__dirname,dist),
           fileName:'my-fist-webpack-bundle.js'
       },
       module:{
           reules:[
               {
                   test:'/\.txt$/',use:'raw-loader'
               }
           ]
       }
   }
2
3
4
5
6
7
8
9
10
11
12
13
14
15
- Plugin
插件负责提供更高级的构建、打包功能
 const HtmlWebpackPlugin=require('Html-webpack-plugin')
 const path=require('path');
    module.exports={
        entry:'./path/to/my/entry/files.js',
        output:{
            path:path.resolve(__dirname,dist),
            fileName:'my-fist-webpack-bundle.js'
        },
        module:{
            reules:[
                {
                    test:'/\.txt$/',use:'raw-loader'
                }
            ]
        },
        plugins:[
            // HtmlWebpackPlugin 为应用生成一个html文件,并且自动注入所有生成的js bundle,这是loader所做不到的
            new HtmlWebpackPlugin({template:'./src/index.html'})
        ]
    }
2
3
4
5
6
7
8
9
10
11
12
13
14
15
16
17
18
19
20
- Mode (webpack4以后)
指明当前的构建任务所处的环境,让webpack针对特定环境启动一些优化项
module.exports={
    mode:'production' // 'node' | 'development' 'production'
}
2
3
# 5.7 深入webpack:高级使用
# 5.7.1 基本配置
# entry
- 单入口
    module.exports={
        entry:'./src/index.js',
    }
2
3
- 多入口
    // 要为每个入口命名
    module.exports={
        home:'./home.js',
        about:'./about.js',
        contact:'./contact.js',
    }
2
3
4
5
6
# output
module.exports={
    output:{
   // 输出bundle文件名,hash是wepack使用散列算法生成一段字符串,这样每次打包的文件名都不样
    // 这样浏览器即使缓存,每次也能加载最新代码
        filename:'[name].[hash].bundle.js',
        // 输出的 chunk文件名,一般是非entry打包出的文件
        chunkFilename:'[id].js'
    }
}
2
3
4
5
6
7
8
9
# 资源的加载
我们可以使用loader来加载非js的资源
    // css/rest.css
    body {
        margin:0px;
    }
    // app.js
    import './css/reset.css'
2
3
4
5
6
对于加载非js的资源我们都应该使用loader,所有要加载css的资源我们可以选择style-loader、css-loader
css-loader使你可以在别的css中可以使用@import的语法引用别的css
style-loader把js代码中import导入的样式文件代码,以一种特殊的方式打包到jsbundle的结果中,然后在js的运行时,将样式自动插入
页面的style标签中。
  module.exports={
      entry:path.resolve(__dirname,'src/index.js'),
      output:{
          filename:path.resolve(__dirname,'dist/'
      }
      mode:"develoment",
      plugins:[....],
      module:{
          reles:[
              {
                  test:/\.css$/,
                  use:['style-loader','css-loader']
              }
          ]
      }
  }
2
3
4
5
6
7
8
9
10
11
12
13
14
15
16
需要注意的是,loader的执行顺序是反的,从数组的最后往前执行,如果使用使用sass,需要配置最后面;这样等sass-loader执行完后的结果
在交给css-loader,要不然依赖倒置就会出现错误。
  module.exports={
      entry:path.resolve(__dirname,'src/index.js'),
      output:{
          filename:path.resolve(__dirname,'dist/'
      }
      mode:"develoment",
      plugins:[....],
      module:{
          reles:[
              {
                  test:/\.css$/,
                  use:[{
                      loader:'style-loader',
                  },
                  {
                      loader:'css-loader',
                  },
                  {
                      loader:'sass-loader',
                      options:{sourceMap:true}
                  }],
                  exclude:'/node_modules/'
              }
          ]
      }
  }
2
3
4
5
6
7
8
9
10
11
12
13
14
15
16
17
18
19
20
21
22
23
24
25
26
# 资源的处理
MiniCssExtractPlugin把css抽离出单独的文件
// loader
{
    test: /\.scss$/,
    MiniCssExtractPlugin.loader,
    'css-loader',
    'sass-loader'
}

// plugin
// 抽取css代码
new MiniCssExtractPlugin({
    filename:'[name].css?v=[contenthash]'
})
2
3
4
5
6
7
8
9
10
11
12
13
# HTML的处理
- HtmlWebpackPlugin
任何js应用都需要由HTML去承载,我们使用HtmlWebpackPlugin去处理项目中的HTML文件
module.exports={
    plugins:[
        new HtmlWebpackPlugin({
            // 输出的文件名
            filename:'index.html'
            // 模块文件的路径
            template:path.resolve(__dirname,'src/index.html'),
            // 配置生成页面的标题
            title:'webpack-主页'
        })
    ]
}
2
3
4
5
6
7
8
9
10
11
12
# 静态资源处理
- 开发中的静态资源
图片、字体、音视频等
{
    test: /\.(png | jpe?g | gif | svg)$/,
    use:[{
        loader:'url-loader',
        options:{
            // 小于8192字节的图片打包成base64图片
            limit:8192,
            name:'images/[name].[hash:8].[ext]',
            publicPath:''
        }
    }]
}

{
    test:/\.(woff | woff2 | svg | eot | ttf)$/
    use:[
        loader:'file-loader',
        options :{
            limit:8192,
            name:'font/[name].[ext]?[hash:8]'
        }
    ]
}
2
3
4
5
6
7
8
9
10
11
12
13
14
15
16
17
18
19
20
21
22
23
# js处理
- babel-loader
不另行指定配置的话,会使用项目的.babelrc.json配置
module:{
    reles:[
        {
            test: /\.(js | jsx)$/,
            use: 'babel-loader',
            include:path.resolve(__dirname,'src')
        }
    ]
}
2
3
4
5
6
7
8
9
# 5.7.2 高级使用
# mode
module.exports={
    mode:'development' // none  | production | development
}
2
3
Mode 用来表示当前的webpack运行环境,本质是在不同的环境下,开启一些内置的优化项
# devServer
- 开发调试
想要在代码发生变化后自动编译代码,有三种方式:
webpack watch mode
webpack-dev-server
webpack-dev-middleware
module.exports={
    devServer:{
        contentBase:__dirname+'dist',
        compress:true,
        port:9000
    }
}
2
3
4
5
6
7
# HMR(模块热替换)
    module.exports={
        devServer:{
            contentBase:__dirname+'dist',
            compress:true,
            port:9000,
            // 开启HMR
            hot:true
        }
    }
2
3
4
5
6
7
8
9
用于在无刷新的情况下,根据文件变动刷新页面的局部状态
# 代码分离
- 为什么要代码分离?
为了将代码分成多个bundle,并灵活定制加载策略(按需加载、并行加载),从而大大提升应用的加载速度。
- 如何代码分离?
入口起起点:使用entry配置手动地分离代码
防止重复:使用SplitChunkPlugin去重和分离chunk
动态导入:通过在代码中使用动态加载模块的语法来分离代码
- 多入口构建
module.exports={
    mode:'development',
    entry:{
        index:'./src/index.js',
        another:'./src/another-module.js'
    },
    output:{
        path:path.resolve(__dirname,'dist'),
        filename:'[name].bundle.js'
    }
}
2
3
4
5
6
7
8
9
10
11
最终结果:
index.bundle.js another.bundle.js
问题:
- 资源可能被重复引入
- 不够灵活
- splitChunks
module.exports={
    mode:'development',
    entry:{
        index:'./src/index.js',
        another:'./src/another-module.js'
    },
    output:{
        path:path.resolve(__dirname,'dist'),
        filename:'[name].bundle.js'
    },
    // 在webpack4 中将splitChunks统一到了optimization中
   optimization :{
    //    查询相关用法,不是插询optimization,而是查询SplitChunksPlugin这个插件
       splitChunks:{
           chunks:'all'
       }
   }

}
2
3
4
5
6
7
8
9
10
11
12
13
14
15
16
17
18
19
- 动态导入
- import()
es module提供语言级的方法
- reuire.ensure
在没有import方法之前,webpack提供的方法
// 动态导入是异步的
import(/*webpackChunkName:loaash*/,'lodash').then(({default:_})=>{

})
.catch(err=>{

})
2
3
4
5
6
7
# 5.8 深入webpack:Loader和Plugin详解
# 5.8.1 loader的编写
- Webpack Loader的基本结构
// 同步的Loader
module.exports=input => input + input
// 异步的Loader
module.exports=function(){
    const callback=this.async()
    callback(null,input+input) //返回值用callback传递出去
}
2
3
4
5
6
7
- loader-utils
loader-utils是编写webpack loader的官方工具库
    const loaderUtils=require('loader-utils')
    module.exports=function (source) {
        // 获取配置
        const options = loaderUtils.getOptions(this)
        const result=source.replace('word',options.name)
        return result
    }
2
3
4
5
6
7
- loader中的 “洋葱模型”
style-loader->css-loader->postcss-loader
在loader执行的时候webpack从左到右依次调用pitch方法,然后在从右到左调用loader本身(execute的过程)。
const loaderUtils =  require("loader-utils")
module.exports= function (input) {
    const { text } = loaderUtils.getOptions(this)
    return input + input
}
/*
 remainingReg 是loader链中排在当前这个loader后面所有的loader以及资源文件组成的一个链接,这个链接我们可以理解为一个路径
 在所有的loader处理完毕后,我们可以在webpack中使用一个特殊的require函数,去require这个路径,从而得到当前loader后所有的loader的处理结果。

 precedingReq 是loader链中排在当前这个loader前面所有的loader以及资源文件所组成的链接

 input 是一个对象,各个loader把共享的数据挂载这个对象上,如果pitch返回一个值;那么webpack就会跳过余下的loader pitch和execute的过程,
 也就是说pitch返回阻断了后续loader的执行

*/
module.exports.pitch=function (remainingReg,precedingReq,input) {
    console.log(`
        remainingReg request :${remainingReg}
        precedingReq request :${precedingReq}
        Input: ${JSON.stringify(input,null,2)}
    `)
    return "pitched"
}
2
3
4
5
6
7
8
9
10
11
12
13
14
15
16
17
18
19
20
21
22
23
- 调试loader
    const fs =require('fs')
    const path = require("path")
    const { runLoaders }= require('loader-runner') //可以创建一个简单loader调试环境

    runLoaders(
        {
            resource : "./demo.txt",
            loaders:[path.resolve(__dirname,"./loaders/demo-loader")],
            readResource: fs.readFile.bind(fs)
        },
        (err,result)=> (err? console.error(err):console.log(result))
    )
2
3
4
5
6
7
8
9
10
11
12
# 5.8.1 plugin的编写
loader有loader-runner作为调试工具,webpack的plugin因为需要的上下文信息太多了,所以没有一个模拟的环境,如果我们要开发plugin需要
配置webpack,在真实的环境中开发。
webpack官方教你如何编写一个plugin (opens new window)
编写pugins我们可以进入webpack网站 (opens new window)查看相关开发api和hooks。
- 搭建开发环境
const path = require("path");
const DemoPlugin = require("./plugins/demo-plugin.js")
const PATHS={
    lib:path.join(__dirname,"app","shake.js"),
    build:path.join(__dirname,"build")
}
module.exports={
    entry : {
        lib:PATHS.lib
    },
    output:{
        path:PATHS.build,
        filename:"[name].js"
    },
    plugins:[new DemoPlugin()]
}
2
3
4
5
6
7
8
9
10
11
12
13
14
15
16
- Compiler 和 Compilation
webpack plugin的本质就是由apply方法的类,通过apply的方法的类我们可以在运行时取得compiler和Compilation这2个实例;
Compiler是编译器的实例(即Webpack),Compilation是每一次编译的过程。
module.exports=class DemoPlugin {
    constructor(){
        this.options=options
    }
    apply(compiler){
        compiler.plugin("emit",(compilation,cb)=>{
            cb()
        })
    }
}
2
3
4
5
6
7
8
9
10
# 案例实战
编写一个WebpackPlugin,统计Webpack打包结果中各个文件的大小,并以JSON形式输出统计结果。
const webpackRources = require('webpack-sources')
class WebpackSizePlugin {
  constructor (options) {
    this.options = options
    this.PLUGIN_NAME = 'WebpackSizePlugin'
  }
  apply (complier) {
    const outputOptions = complier.options.output // 拿到output配置,拿到文件最终的输出路径是什么
    // 我们插件的目的是统计出打包出来文件的大小,所以我们需要注册到打包结果后的hooks上,由于要输出json,所以要在输出硬盘之前
    complier.hooks.emit.tap(
      this.PLUGIN_NAME, // 插件的名称
      compilation => { // 在这个函数中可以读取和操作本次编译的结果
        const assets = compilation.assets // 所有的编译结果都可以通过compilation.assets拿到
        const buildSize = {}
        const files = Object.keys(assets)
        let total = 0
        for (let file of files) {
          const size = assets[file].size()// 拿到字符数
          buildSize[file] = size
          total += size
        }
        console.log('Build Size', buildSize)
        console.log('Total Size', total)
        buildSize.total = total
        // 想要webpack生成一个文件,只需这个文件以键值对的形式加入到assets对象中,那么在打包执行完毕之后,webpack会自动帮我们生成
        assets[
          outputOptions.publicPath + '/' + (this.options ? this.options.fileName : 'build-size.json')
        ] = new webpackRources.RawSource(JSON.stringify(buildSize, null, 4))
        // assets对象中文件的内容,也就是说assets对象中每一项的值它是一个RawSource对象,而不是一个普通的字符串,上面要输出rawsource对象
      }
    )
  }
}
2
3
4
5
6
7
8
9
10
11
12
13
14
15
16
17
18
19
20
21
22
23
24
25
26
27
28
29
30
31
32
33
webpack配置
plugins: [new WebpackSizePlugin({ fileName: 'size.json' })]
# 扩展学习
loader-utils项目地址: (opens new window)
# 5.9 webpack性能优化
# 5.9.1 webpack数据分析
# webpack-bundle-analyzer(文件体积分析)
它能分析打包出的文件有哪些,大小占比如何,模块包含关系,依赖项,文件是否重复,压缩后大小
- webpack.config.js
const {BundleAnalyzerPlugin} = require('webpack-bundle-analyzer')
module.exports={
plugins: [
    new BundleAnalyzerPlugin({
    analyzerMode: 'disabled', // 不启动展示打包报告的http服务器
    generateStatsFile: true, // 是否生成stats.json文件
    })
 ]
}
2
3
4
5
6
7
8
9
- package.json
"scripts": {
  "build": "webpack",
  "start": "webpack serve",
  "dev":"webpack  --progress",
   "analyzer": "webpack-bundle-analyzer --port 8888 ./dist/stats.json"
}
2
3
4
5
6
# speed-measure-webpack-plugin(分析打包速度)
- webpack.config.js
const SpeedMeasureWebpackPlugin = require('speed-measure-webpack5-plugin');
const smw = new SpeedMeasureWebpackPlugin();
module.exports = smw.wrap({
  mode: "development",
  devtool: 'source-map',
  ...
});
2
3
4
5
6
7
# friendly-errors-webpack-pluginK(美化输出日志)
yarn friendly-errors-webpack-plugin node-notifier -D
const path = require("path");
const HtmlWebpackPlugin = require("html-webpack-plugin");
const FriendlyErrorsWebpackPlugin = require('friendly-errors-webpack-plugin');
const notifier = require('node-notifier');

module.exports = {
  mode: "development",
  devtool: 'source-map',
  context: process.cwd(),
  entry: {
    main: "./src/index.js",
  },
  output: {
    path: path.resolve(__dirname, "dist"),
    filename: "main.js"
},
plugins:[
    new HtmlWebpackPlugin(),
    new FriendlyErrorsWebpackPlugin({
    onErrors: (severity, errors) => {
    const error = errors[0];
    notifier.notify({
    title: "Webpack编译失败",
    message: severity + ': ' + error.name, subtitle: error.file || '',
    })
    }
  })
 ]
};
2
3
4
5
6
7
8
9
10
11
12
13
14
15
16
17
18
19
20
21
22
23
24
25
26
27
28
29
# 5.9.2 编译时间优化
# 🍅 1. extensions
- 添加extensions后我们在用
require、import的时候不用添加文件扩展名 - 编译的时候会依次添加扩展名进行匹配
module.exports = {
    resolve: {
        extensions:[".js"、".jsx"、".json"]
    }
}
2
3
4
5
# 🍅 2. alias
配置文件别名可以加快webpack查找模块的速度
const elementUi = path.resolve(__dirname,'node_modules/element-ui/lib/theme-chalk/index.css')
module.exports = {
        resolve: {
        extensions:[".js"、".jsx"、".json"],
        alias: {'element-ui'}
    }
}
2
3
4
5
6
7
当我们引入elementUi模块的时候,它会直接引入elementUi,不需要从node_modules文件中按模块规则查找
# 🍅 3. modules
指定项目的所有第三方模块都是在项目根目录下的node_modules
const elementUi = path.resolve(__dirname,'node_modules/element-ui/lib/theme-chalk/index.css')
module.exports = {
        resolve: {
        extensions:[".js"、".jsx"、".json"],
        modules: ['node_modules']
    }
}
2
3
4
5
6
7
# 🍅 4. oneOf
- 每个文件对于rules中的所有规则都会遍历一遍,如果使用oneOf,只要能匹配一个就立即退出
- 在oneOf中不能2个配置处理同一类型文件
module.exports = {
  module: {
    rules: [{
     oneOf:[
         {
          test: /\.js$/,
          include: path.resolve(__dirname, "src"),
          exclude: /node_modules/,
          use: [
                {
                loader: 'thread-loader',
                options: {
                workers: 3
                }
            },
            {
              loader:'babel-loader',
              options: {
                cacheDirectory: true
              }
            }
          ]
        },
        {
          test: /\.css$/,
          use: ['cache-loader','logger-loader', 'style-loader', 'css-loader']
       }
     ]
    }]
  }
}
2
3
4
5
6
7
8
9
10
11
12
13
14
15
16
17
18
19
20
21
22
23
24
25
26
27
28
29
30
31
# 🍅 5. external
如果某个库我们不想让它被webpack打包,想让它用cdn的方法是引入,并且不影响我们在程序中以CMD、AMD方式进行使用
下载插件
yarn add html-webpack-externals-plugin -D
在html文件中引入cdn的文件
<script src="https://cdn.abc.com/vue/2.5.11/vue.min.js"></script>
webpack中的配置
 externals: {
  vue: 'vue',
},
2
3
# 🍅 6. resolveLoader
就是指定loader的resolve,只作用于loader;resolve配置用来影响webpack模块解析规则。解析规则也可以称之为检索,索引规则。配置索引规则能够缩短webpack的解析时间,提升打包速度。
module.exports = {
    resolve: {
        extensions:[".js"、".jsx"、".json"],
        modules: ['node_modules']
    },
    resolveLoader:{
     modules: [path.resolve(__dirname, "loaders"),'node_modules'],
  },
}
2
3
4
5
6
7
8
9
# 🍅 7. noParse
- 用于配置哪些模块的文件内容不需要进行解析
- 不需要解析依赖就是没有依赖的第三方大型类库,可以配置这个字段,以提高整体的构建速度
- 使用noparse进行忽略的模块文件中不能使用import、require等语法
module.exports = {
module: {
    noParse: /test.js/, // 正则表达式
 }
}
2
3
4
5
# 🍅 8. thread-loader(多进程)
- 把thread-loader放置在其他 loader 之前
- include 表示哪些目录中的 .js 文件需要进行 babel-loader
- exclude 表示哪些目录中的 .js 文件不要进行 babel-loader
- exclude 的优先级高于 include ,尽量避免 exclude ,更倾向于使用 include
module.exports = {
  module: {
    rules: [{
     oneOf:[
         {
          test: /\.js$/,
          include: path.resolve(__dirname, "src"),
          exclude: /node_modules/,
          use: [
                {
                loader: 'thread-loader',
                options: {
                  workers: require('os').cpus().length - 1 // 自己电脑的核心数减1
                }
            },
            {
              loader:'babel-loader',
              options: {
             // babel在转移js非常耗时间,可以将结果缓存起来,下次直接读缓存;默认存放位置是 node_modules/.cache/babel-loader
                cacheDirectory: true
              }
            }
          ]
        },
        {
          test: /\.css$/,
          use: ['cache-loader','logger-loader', 'style-loader', 'css-loader']
       }
     ]
    }]
  }
}
2
3
4
5
6
7
8
9
10
11
12
13
14
15
16
17
18
19
20
21
22
23
24
25
26
27
28
29
30
31
32
# 🍅 8. cache-loader
- 在一些性能开销较大的loader之前添加cache-loader,可以将结果缓存到磁盘中
- 默认保存在 node_modules/.cache/cache-loader 目录下
module.exports = {
  module: {
    rules: [{
     oneOf:[
        {
          test: /\.css$/,
          use: ['cache-loader','logger-loader', 'style-loader', 'css-loader']
       }
     ]
    }]
  }
}
2
3
4
5
6
7
8
9
10
11
12
# 🍅 9. hard-source-webpack-plugin
- HardSourceWebpackPlugin 为模块提供了中间缓存,缓存默认的存放路径是 node_modules/.cache/hard-source
- 配置 hard-source-webpack-plugin 后,首次构建时间并不会有太大的变化,但是从第二次开始, 构建时间大约可以减少80% 左右
- webpack5中已经内置了模块缓存,不需要再使用此插件
yarn add hard-source-webpack-plugin -D
const HardSourceWebpackPlugin = require('hard-source-webpack-plugin');
module.exports = {
plugins: [
   new HardSourceWebpackPlugin()
 ]
}
2
3
4
5
6
# 5.9.3 编译体积优化
# 🍅 1. 压缩js、css、HTML和图片
- optimize-css-assets-webpack-plugin是一个优化和压缩CSS资源的插件
- terser-webpack-plugin是一个优化和压缩JS资源的插件
- image-webpack-loader可以帮助我们对图片进行压缩和优化
yarn terser-webpack-plugin optimize-css-assets-webpack-plugin image-webpack-
loader -D
2
const path = require('path');
const HtmlWebpackPlugin = require('html-webpack-plugin');
const MiniCssExtractPlugin = require('mini-css-extract-plugin');
const OptimizeCssAssetsWebpackPlugin = require('optimize-css-assets-webpack-plugin')
const TerserPlugin = require('terser-webpack-plugin');

module.exports = {,
  optimization: {
     minimize: true
     minimizer: [
         new TerserPlugin()
     ]
  },
   module:{
     rules:[
         {
          test: /\.(png|svg|jpg|gif|jpeg|ico)$/,
          use: [
            'url-loader',
            {
                loader: 'image-webpack-loader',
                options: {
                    mozjpeg: {
                       progressive:true,
                       quality: 65
                    },
                    optipng: {
                        enabled: false
                    },
                    pngquant: {
                        quality: '65-90',
                        speed: 4
                    },
                    gifsicle: {
                        interlaced: false
                    },
                    webp: {
                         quality: 75,
                    }
                }
            }
         }]
     ]
  },
  plugins:[
     new HtmlWebpackPlugin({
         template: './src/index.html',
          minify: {
              collapseWhitespace: true,
              removeComments: true
         }
     })
    new OptimizeCssAssetsWebpackPlugin(),
  ]
 }
2
3
4
5
6
7
8
9
10
11
12
13
14
15
16
17
18
19
20
21
22
23
24
25
26
27
28
29
30
31
32
33
34
35
36
37
38
39
40
41
42
43
44
45
46
47
48
49
50
51
52
53
54
55
# 🍅 2. 清除无用的css
purgecss-webpack-plugin单独提取CSS并清除用不到的CSS
const MiniCssExtractPlugin = require("mini-css-extract-plugin");
const PurgecssPlugin = require("purgecss-webpack-plugin");
const glob = require("glob");
const PATHS = {
    src: path.join(__dirname, "src"),
};

module.exports = {,
  optimization: {
     minimize: true
     minimizer: [
         new TerserPlugin()
     ]
  },
   module:{
     rules:[
         {
          test: /\.css$/,
          include: path.resolve(__dirname, "src"),
          exclude: /node_modules/,
          use: [
            {
              loader: MiniCssExtractPlugin.loader,
            },
             "css-loader",
         }]
     ]
  },
  plugins:[
     new MiniCssExtractPlugin({
         filename: "[name].css"
     })
    new OptimizeCssAssetsWebpackPlugin({
        paths: glob.sync(`${PATHS.src}/**/*`, { nodir: true})
    }),
  ]
 }
2
3
4
5
6
7
8
9
10
11
12
13
14
15
16
17
18
19
20
21
22
23
24
25
26
27
28
29
30
31
32
33
34
35
36
37
# 🍅 3. Tree shaking
- webpack默认支持,可在 production mode下默认开启
- 在package.json 中配置:
- "sideEffects": false 所有的代码都没有副作用(都可以进行 tree shaking)
- 可能会把 css和@babel/polyfill 文件干掉可以设置 "sideEffects":["*.css"]
会把以下情况的代码 Tree shaking
- 没有导入和使用
function func1(){
  return 'func1';
}
function func2(){
  return 'func2';
}
export {
  func1,
  func2
}
2
3
4
5
6
7
8
9
10
import {func2} from './functions';
var result2 = func2();
console.log(result2);
2
3
- 代码不会被执行,不可到达
if(false){
 console.log('false')
}
2
3
- 代码执行的结果不会被用到
import {func2} from './functions';
func2();
2
- 代码中只写不读的变量
var a=1
a= 2
2
# 🍅 3. Scope Hoisting
- Scope Hoisting 可以让 Webpack 打包出来的代码文件更小、运行的更快,它又译作 "作用域提升",是在 Webpack3 中新推出的功能。
- scope hoisting的原理是将所有的模块按照引用顺序放在一个函数作用域里,然后适当地重命名一 些变量以防止命名冲突
- 这个功能在mode为 下默认开启,开发环境要用 webpack.optimizeModuleConcatenationPlugin 插件
doc.js
export default 'test';
app.js
import str from './doc.js';
console.log(str)
2
作用域提升
var str = ('test');
console.log(str);
2
# 5.9.4 运行速度优化
- 对于大的Web应用来讲,将所有的代码都放在一个文件中显然是不够有效的,特别是当你的某些 代码块是在某些特殊的时候才会被用到。
- webpack有一个功能就是将你的代码库分割成chunks语块,当代码运行到需要它们的时候再进行 加载
# 🍅 1. 入口点分割
module.exports = {
 entry: {
        index: "./src/index.js",
        login: "./src/login.js"
 }
}
2
3
4
5
6
- 这种方法的问题
- 如果入口chunks之间包含重复的模块(lodash),那些重复模块都会被引入到各个bundle中
- 不够灵活,并且不能将核心应用程序逻辑进行动态拆分代码
# 🍅 2. 懒加载
可以用import()方式去引入模块,当需要的时候在加载某个功能对应代码
const Login = () => import(/* webpackChunkName: "login" */'@/components/Login/Login')
# 🍅 3. prefetch
- 使用预先拉取,你表示该模块可能以后会用到。浏览器会在空闲时间下载该模块
- prefetch的作用是告诉浏览器未来可能会使用到的某个资源,浏览器就会在闲时去加载对应的资 源,若能预测到用户的行为,比如懒加载,点击到其它页面等则相当于提前预加载了需要的资源
<link rel="prefetch" as="script" href="test.js">此方法添加头部,浏览器会在空闲时间预先拉取该文件
import(/* webpackChunkName: 'login', webpackPrefetch: true
*/'./login').then(result => {
        console.log(result.default);
});
2
3
4
# 🍅 4. 提取公共代码
splitChunks (opens new window)
webpack
module.exports = {
output:{
      filename:'[name].js',
      chunkFilename:'[name].js'
    },
 entry: {
        index: "./src/index.js",
        login: "./src/login.js"
 },
optimization: {
    splitChunks: {
    chunks: 'all',  // 分割同步异步的代码
    minSize: 0,    // 最小体积
    minRemainingSize: 0, // 代码分割后的最小保留体积,默认等于minSize
    maxSize: 0,  // 最大体积
    minChunks: 1,  // 最小代码快
    maxAsyncRequests: 30, // 最大异步请求数
    maxInitialRequests: 30, // 最小异步请求数
    automaticNameDelimiter: '~', // 名称分离符
    enforceSizeThreshold: 50000, //执行拆分的大小阈值,忽略其他限制
    // (minRemainingSize、maxAsyncRequests、maxInitialRequests)
    cacheGroups: {
    defaultVendors: {
        test: /[\\/]node_modules[\\/]/,//控制此缓存组选择哪些模块
        priority: -10,//一个模块属于多个缓存组,默认缓存组的优先级是负数,自定义缓存组的优先级更高,默认值为0 //如果当前代码块包含已经主代码块中分离出来的模块,那么它将被重用,而不是生成新的模块。这可能会影响块的结果文件名。
    },
    default: {
                minChunks: 2,
                priority: -20
            }
    }
  }
}
 plugins: [
      new HtmlWebpackPlugin({
        template:'./src/index.html',
        filename:'page1.html',
        chunks:['index']
      }),
      new HtmlWebpackPlugin({
        template:'./src/index.html',
        filename:'page2.html',
        chunks:['login']
      }),
 ]
}
2
3
4
5
6
7
8
9
10
11
12
13
14
15
16
17
18
19
20
21
22
23
24
25
26
27
28
29
30
31
32
33
34
35
36
37
38
39
40
41
42
43
44
45
46
# 🍅 4. CDN
- 最影响用户体验的是网页首次打开时的加载等待。 导致这个问题的根本是网络传输过程耗时大, CDN的作用就是加速网络传输。
- CDN 又叫内容分发网络,通过把资源部署到世界各地,用户在访问时按照就近原则从离用户最近 的服务器获取资源,从而加速资源的获取速度
- 用户使用浏览器第一次访问我们的站点时,该页面引入了各式各样的静态资源,如果我们能做到持 久化缓存的话,可以在 http 响应头加上 Cache-control Expires字段来设置缓存,浏览器可以 将这些资源一一缓存到本地
- 用户在后续访问的时候,如果需要再次请求同样的静态资源,且静态资源没有过期,那么浏览器可以直接走本地缓存而不用再通过网络请求资源
- 缓存配置
- HTML文件不缓存,放在自己的服务器上,关闭自己服务器的缓存,静态资源的URL变成指向 CDN服务器的地址
- 静态的JavaScript、CSS、图片等文件开启CDN和缓存,并且文件名带上HASH值
- 为了并行加载不阻塞,把不同的静态资源分配到不同的CDN服务器上
- 域名限制
- 同一时刻针对同一个域名的资源并行请求是有限制 可以把这些静态资源分散到不同的 CDN 服务上去 多个域名后会增加域名解析时间
- 可以通过在 HTML HEAD 标签中 加入去预解析域名,以降低域名解析带来的延迟

